-
[FCM] FCM으로 notification 구현 - 4 (클라이언트쪽 구현1)Android 2025. 9. 27. 08:24728x90반응형
firebase functions를 사용해 앱서버를 만들었고 이제 클라이언트쪽을 구현하면 된다
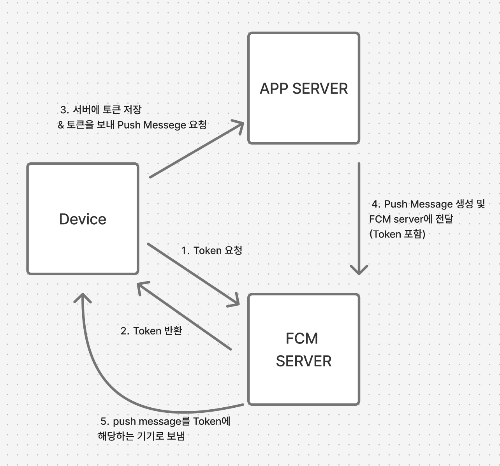
일단 FCM server에서 토큰을 받아와야한다
특정 기기로 알림 메세지를 보내기 위해서는 토큰이 필요하기 때문에 토큰발급이 필요하다
FirebaseMessaging.getInstance().getToken()를 사용해 토큰을 요청할 수 있다
나의 경우 mainActivity가 onCteate될 때 토큰을 요청해서 preference에 저장하게 했다
@AndroidEntryPoint
class MainActivity : ComponentActivity() {

    override fun onCreate(savedInstanceState: Bundle?) {
        super.onCreate(savedInstanceState)
        enableEdgeToEdge()
        val preference = AppPreferenceManager.getInstance()

        /**
         * FCM token을 받아오고 sharedPreference에 저장함
         * */
        FirebaseMessaging.getInstance().token.addOnCompleteListener(OnCompleteListener { task ->
            if (!task.isSuccessful) {
                return@OnCompleteListener
            }

            val token = task.result
            if (token != preference.fcmToken) {
                preference.fcmToken = token
            }
        })

        setContent {
            AppTheme {
                Surface(
                ) {
                    AppNavigation()
                }
            }
        }
    }
}
새로운 토큰이 생성될 때마다 onNewToken이라는 메소드가 실행된다
처음 토큰을 발급받는 경우에도 이에 해당된다
처음 토큰을 받는 상황 외에 새로운 토큰이 생성되는 경우는 다음과 같다고 한다
- 새로운 기기에서 앱 복원
- 앱 제거 후 재설치
- 앱 데이터 제거
토큰을 새로 발급받고나서 할 작업을 작성해주면 되는데
나의 경우 preference에 저장한 토큰과 비교해서 다른 경우 preference에 새 토큰값을 저장하고 fireStore에 Token collection에 userId와 함께 토큰값을 저장하게 했다
@AndroidEntryPoint
class FCMService : FirebaseMessagingService() {
    private val preference = AppPreferenceManager.getInstance()

    @Inject
    lateinit var fcmRepository: IMyPageSettingRepository


    /**
     * 새롭게 토큰을 받아올 때(앱을 처음 실행, 삭제 후 설치 등)
     *
     * @param token: FCM server에서 보내주는 FCM Token
     * */
    override fun onNewToken(token: String) {
        super.onNewToken(token)

        /**
         * 로컬에 저장된 token과 새로 받아온 토큰 비교, 같지 않다면 새로 받아온 토큰으로 업데이트
         */
        if (token != preference.fcmToken) {
            preference.fcmToken = token
            if (preference.userId.isEmpty()) return

            // fireStore에 fcm token 관련 데이터 업데이트
            CoroutineScope(Dispatchers.IO).launch {
                fcmRepository.sendTokenToServer(
                    FcmTokenData(
                        userId = preference.userId,
                        token = token
                    )
                )
            }
        }
    }
그러면 3번까지는 끝이났다
참고로 나는 firebase functions를 썼기 때문에 문서가 업데이트되거나 생성될 때 알아서 자동으로 함수 트리거가 작동하기 때문에 4번은 하지않았지만 백엔드와 같이 하시는 분은 따로 얘기를 해봐야할거같다...
functions에서 문서가 트리거가 된 이후 getMesseging().send()를 통해서 message 객체를 token 값과 함께 FCM server로 보내고, FCM server에서 해당 토큰을 보고 토큰값에 해당하는 특정 기기로 message를 보내준다
const messaging = getMessaging();

//.. 중간생략

const message = {
  data: {
    title: notificationMessages.comments.title,
    body: notificationMessages.comments.body(commentAuthorName, postTitle, previewComment),
    type: type[1],
    postId: postId,
    commentId: commentId,
    commentUserId: commentAuthorId,
  },
  token: userSettings.token,
};
await messaging.send(message);
이렇게 보낸 메세지를 수신하려면 어떻게 해야할까?
맨 처음 FCM 설정을 할 때 AndroidManifest.xml에 작성한 서비스에 onMessageReceived()를 정의해주면 된다
message는 FCM 서버로부터 받은 메세지를 말하는 것이다
message로부터 제목과 내용, 카테고리를 뽑아서 notificationCompat.Builder()로 알림에 관한 설정을 한 후, notification channel을 통해 휴대폰의 상태바로 message의 내용들을 보낸다
@AndroidEntryPoint
class FCMService : FirebaseMessagingService() {
/**
 * FCM 서버에서 push message를 받았을 때 실행
 *
 * @param message FCM 서버에서 받은 push Message (data) 객체
 */
override fun onMessageReceived(message: RemoteMessage) {
    super.onMessageReceived(message)
    val pushMsgCategory = message.data["type"]

    // 서버에서 받은 메세지 중 제목, 내용 추출
    val pushTitle = message.data["title"]
    val pushBody = message.data["body"]

    // 각 notification id
    val notificationId = System.currentTimeMillis().toInt()

    // 제목과 내용이 null이 아니면 휴대폰의 상태바로 push message를 알림으로 보여줌
    if (pushTitle != null && pushBody != null) {
        when (pushMsgCategory) {
            "Likes" -> {
                sendToStatusBarPushMessage(
                    pushTitle,
                    pushBody,
                    NotificationType.LIKES,
                    message.data,
                    channelId = NotificationConstant.LIKES_CHANNEL_ID,
                    channelName = NotificationConstant.LIKES_CHANNEL_NAME,
                    notificationId = notificationId
                )
                saveNotificationToDB(
                    id = notificationId.toString(),
                    title = pushTitle,
                    body = pushBody,
                    type = NotificationType.LIKES,
                    data = message.data
                    )
            }

            "Comments" -> {
                sendToStatusBarPushMessage(
                    pushTitle,
                    pushBody,
                    NotificationType.COMMENTS,
                    message.data,
                    channelId = NotificationConstant.COMMENTS_CHANNEL_ID,
                    channelName = NotificationConstant.COMMENTS_CHANNEL_NAME,
                    notificationId = notificationId
                )
                saveNotificationToDB(
                    id = notificationId.toString(),
                    title = pushTitle,
                    body = pushBody,
                    type = NotificationType.COMMENTS,
                    data = message.data
                )
            }
        }
    } else {
        Log.e("FCM error", "FCM Null 혹은 type X")
    }
  }
}
notificationBuilder로 notification에 관한 설정을 할 때 setContentIntent()에 pendingIntent를 넣어주어야한다
왜냐하면 바로 intent를 하면 알림이 생성되자마자 intent가 실행되면서 이동이 되기 때문에 알림이 눌릴 때 intent 하기 위해서(지연시켜서 intent하기 위해서) pendingIntent를 정의해주었다
/**
 * 받은 메세지를 사용자 기기의 상태바로 보여주는 함수
 * 알림을 터치할 때 앱의 상태(background, foreground) 상태에 따라서
 * 설정한 Activity로 이동 및 알림에 맞는 화면으로 네비게이션
 *
 * @param title 알림 제목
 * @param body 알림 내용
 * @param fcmType 알림 타입 (LIKES, COMMENTS, UNREAD)
 * @param data 전달받은 추가적인 데이터
 * @param requestCode PendingIntent 구별을 위한 요청 코드
 * @param channelId 알림별 채널 아이디
 * @param channelName 알림 채널 이름(설정화면에 표시)
 * @param notificationId 알림별 고유 아이디
 * @param context Context
 * @param icon 상태바에 표시될 알림 아이콘
 * @param autoCancel 알림터치 시 자동으로 제거할지 여부
 */
fun sendToStatusBarPushMessage(
    title: String,
    body: String,
    type: NotificationType,
    data: Map<String, String>,
    requestCode: Int = LocalTime.now().hashCode(),
    channelId: String,
    channelName: String,
    notificationId: Int,
    context: Context,
    icon: Int,
    autoCancel: Boolean
) {

    /**
     * intent에 putExtra로 담을 navigation route 값
     * */
    val notificationDestination = handleFcmRoute(type, data)

    /**
     * 알림터치 시 실행할 intent 생성
     *
     * intent할 때 이동할 라우트 값(notificationDestination)과 알림 아이디(notificationId)를 담아서 전달
     * */
    val pendingTarget = Intent(context, SplashActivity::class.java).apply {
                putExtra(FCM_DESTINATION_KEY, notificationDestination)
                addFlags(Intent.FLAG_ACTIVITY_NEW_TASK or Intent.FLAG_ACTIVITY_CLEAR_TASK)
            }

    /**
     * pendingIntent 생성
     *
     * 사용자가 알림을 터치했을 때 Activity를 실행하도록 예약(즉시 실행되는게 아니라 사용자가 터치하는 시점에 실행되도록 pending 설정)
     *
     * */
    val pendingIntent = PendingIntent.getActivity(
        context, requestCode, pendingTarget,
        PendingIntent.FLAG_UPDATE_CURRENT or PendingIntent.FLAG_IMMUTABLE
    )

    /**
     * notification 관련 설정
     * */
   val notificationBuilder = customNotificationBuilder(
        context,
        channelId,
        title,
        body,
        icon,
        pendingIntent,
        autoCancel
    )

    showNotification(notificationBuilder, channelId, channelName, notificationId, context = context)
}

/**
 * notificationCompat.Builder를 통해 알림 관련 설정
 *
 * @param context Context
 * @param channelId 알림 채널 아이디
 * @param title 알림 제목
 * @param content 알림 내용
 * @param icon 알림 아이콘
 * @param pendingIntent 알림을 누를 때 실행될 PendingIntent
 * @param autoCancel 알림을 터치 후 자동으로 제거할지에 관한 설정
 *
 * @return 설정이 완료된 NotificationCompat.Builder
 * */
private fun customNotificationBuilder(
    context: Context,
    channelId: String,
    title: String,
    content: String,
    icon: Int,
    pendingIntent: PendingIntent,
    autoCancel: Boolean
): NotificationCompat.Builder {
    return NotificationCompat.Builder(context, channelId)
        .setContentTitle(title)
        .setSmallIcon(icon)
        .setContentText(content)
        .setContentIntent(pendingIntent) // 알림을 터치할 때 실행할 intent 설정
        .setAutoCancel(autoCancel)
}

/**
 * notification manager를 통해 알림별로 notification channel을 생성하고 android system에 전달해 상태바에 표시하는 함수
 *
 * @param notificationBuilder notification 설정 관련 NotificationCompat.Builder 객체
 * @param channelId 알림 채널 아이디
 * @param channelName 알림 채널 이름
 * @param notificationId 알림 별 고유 아이디
 * @param importance 알림 중요도
 * @param context Context
 * */
private fun showNotification(
    notificationBuilder: NotificationCompat.Builder,
    channelId: String,
    channelName: String,
    notificationId: Int,
    importance: Int = NotificationManager.IMPORTANCE_DEFAULT,
    context: Context
) {

    /**
     * android system service 중 notification service 가져오기
     * */
    val notificationManager = context.getSystemService(NOTIFICATION_SERVICE) as NotificationManager

    /**
     * notification channel 생성
     * */
    val notificationChannel = NotificationChannel(
        channelId,
        channelName,
        importance
    )

    /**
     * system에 앞서 만들었던 channel 등록
     * */
    notificationManager.createNotificationChannel(notificationChannel)

    /**
     * 위에서 설정한 알림을 system에 전달해서 상태바에 표시
     * */
    notificationManager.notify(notificationId, notificationBuilder.build())
}
- setContentTitle : 알림에 보여줄 제목 부분 설정
- setSmallIcon: 알림에 보여줄 아이콘
- setContentText : 알림 내용
- setContentIntent(pendingIntent) : 알림을 터치할 때 실행할 intent 설정
- setAutoCancel : 알림을 터치하고 나서 자동으로 삭제되게 함
나의 경우 여기서 두 가지 문제가 생겼었다
1. pendingIntent에서 putExtra로 넘겨준 값이 null임
2. 알림을 터치할 때 원하는 스크린으로 이동이 안 됨
~ 문제점 1번을 해결해보자 ~
일단 내 프로젝트는 싱글 액티비티가 아니었다
SplashActivity -> preference에 닉네임이 있는지 여부 확인 -> 있다면 MainActivity 아니라면 LoginActivity로 이동이라는 흐름이었다(xml로 하던 프로젝트를 컴포즈로 마이그레이션한 프로젝트였음...ㅎ...)
근데 pendingTarget을 무조건 SplashActivity로 하니까 앱이 포그라운드에 있어도 무조건 splashActivity부터 시작하고(근데 이건 위와 같이 설정했으니까 당연...) putExtra로 넘겨준 값도 제대로 안 넘어갔다...
우선 앱이 실행된 상태에서 알림을 눌렀을 때 SplashActivity가 시작되는 건 좀 ui적으로 이상하다는 생각이 들었다. 그래서 앱이 백그라운드 상태일 때와 아닐 때를 구분지어 내가 원하는대로 intent 해주기 위해 앱이 백그라운드인지 아닌지부터 체크해서 분기점을 만들어줘야할 거 같았다
검색해보니 라이프사이클을 관찰할 수 있는 API가 있었다!
https://developer.android.com/reference/androidx/lifecycle/DefaultLifecycleObserver
DefaultLifecycleObserver | API reference | Android Developers
androidx.appsearch.builtintypes.properties
developer.android.com
https://developer.android.com/reference/androidx/lifecycle/LifecycleEventObserver
LifecycleEventObserver | API reference | Android Developers
androidx.appsearch.builtintypes.properties
developer.android.com
DefaultLifecycleObserver와 LifcecycleEventObserver 이렇게 두 개가 있었다
더보기DefaultLifecycleObserver와 LifcecycleEventObserver 차이점
간단하게 말하자면 메소드별로 호출되는 시점이 다른 것과 DefaultLifecycleObserver와 LifcecycleEventObserver를 같이 사용시 DefaultLifecycleObserver가 먼저 실행되고 그 다음 LifcecycleEventObserver의 onStateChange()가 실행된다는 점이다
일단 공식홈페이지에서는 DefaultLifecycleObserver가 호출하는 메소드들의 시점이 조금씩 달랐다
DefaultLifecycleObserver의 경우 onCreate, onResume, onStart는 LifecycleOwner의 onCreate, onResume, onStart가 실행된 후에 호출이 된다
onDestroy, onPause, onStop은 LifecycleOwner의 onCreate, onResume, onStart가 실행된 되기 전에 호출이 된다
LifcecycleEventObserver의 경우 onStateChange()는 라이프사이클의 state가 변환되면 호출되는 거 같다
보니까 두 개가 거의 비슷했지만 후자가 onStateChange() 하나로 다 라이프사이클을 관리할 수 있는게 편하기 때문에 선택했다
DefaultLifecycleObserver는 특정 라이프사이클에 할 작업을 작성할 때 좋을 거 같다
LifcecycleEventObserver를 Application에 추가했다
Application은 앱의 전역 상태를 유지하기 위한 기본 클래스이기 때문이다!
@HiltAndroidApp
class ChakSaiApplication : Application(), LifecycleEventObserver {

    companion object {
        private lateinit var composeApplication: ChakSaiApplication
        fun getInstance() = composeApplication

        var isBackground = false
        val TAG = "Application"
    }

    override fun onCreate() {
        super.onCreate()
        composeApplication = this
        KakaoMapSdk.init(this, BuildConfig.KAKAO_API_KEY)
        KakaoSdk.init(this, BuildConfig.KAKAO_API_KEY )

        ProcessLifecycleOwner.get().lifecycle.addObserver(this)
    }

override fun onStateChanged(source: LifecycleOwner, event: Lifecycle.Event) {
        when(event) {
            Lifecycle.Event.ON_CREATE -> {
                Log.d(TAG, "ON_CREATE")
                isBackground = false
            }
            Lifecycle.Event.ON_START -> {
                Log.d(TAG, "ON_START")
                isBackground = false
            }
            Lifecycle.Event.ON_RESUME -> {
                Log.d(TAG, "ON_RESUME")
                isBackground = false
            }
            Lifecycle.Event.ON_PAUSE -> {
                Log.d(TAG, "ON_PAUSE")
                isBackground = true
            }
            Lifecycle.Event.ON_STOP -> {
                Log.d(TAG, "ON_STOP")
                isBackground = true
            }
            else -> {
                ProcessLifecycleOwner.get().lifecycle.removeObserver(this)
            }
        }
    }

}
ProcessLifecycleOwner를 통해 Application을 앱의 전체적인 라이프사이클을 관찰할 수 있는 옵저버로 등록한다
그래서 라이프사이클이 바뀌면 ProcessLifecycleOwner가 옵저버가 등록된 곳의 onStateChange()를 호출한다
로그를 찍어보니 아래와 같이 작동한다


그리고 백그라운드 상태인지에 따라서 pendingIntent에 분기점을 만들어 다른 액티비티로 이동하게 했다
/**
 * notification을 누르면 이동할 타겟(Activity) 설정
 * background 상태인지 아닌지에 따라 분기처리해서 intent할 activity를 다르게 설정함
 * */
val pendingTarget = when (ChakSaiApplication.isBackground) {
    true -> {
        Intent(this, SplashActivity::class.java).apply {
            putExtra(FCM_DESTINATION_KEY, fcmDestination)
            addFlags(Intent.FLAG_ACTIVITY_NEW_TASK or Intent.FLAG_ACTIVITY_CLEAR_TASK)
        }
    }
    false -> {
        Intent(this, MainActivity::class.java).apply {
            putExtra(FCM_DESTINATION_KEY, fcmDestination)
            addFlags(Intent.FLAG_ACTIVITY_SINGLE_TOP or Intent.FLAG_ACTIVITY_CLEAR_TOP)
        }
    }
}
분기점에 맞게 액티비티가 이동되었다!
백그라운드 여부에 따라 잘 intent되는지 확인을 해본 결과 앱이 포그라운드 상태일때는 onNewIntent()가 필요했다
onNewIntent란?
액티비티가 실행중일 때 새로운 intent로 다시 해당 액티비티가 호출될 때 실행되는 메소드이다
여기서 setIntent(intent)를 해주어야하는데, 액티비티에 들어온 intent를 새로운 intent로 바꾸어주는 역할을 한다
<activity
    android:name=".MainActivity"
    android:launchMode="singleTop"
    >
</activity>
이 때 AndroidManefest.xml에 해당 액티비티의 launchMode를 singleTop으로 바꾸어주었다
왜냐면 task의 맨 위에 해당 액티비티가 존재할 때 onNewIntent()를 호출하기 때문이다
예를 들면 앱을 처음 실행하면 MainActivity가 실행되고 onCreate가 실행된다
그 후 새로운 알림이 와서 누른다면 이미 task의 맨 위에 MainActivity가 있기 때문에 onCreate는 실행되지 않고 onNewIntent()가 실행된다. 아까 위에서 적었던 pendingTarget의 PutExtra(알림을 누르면 이동해야하는 스크린의 주소값)값이 다르게 들어갔으므로 setIntent로 새롭게 들어온 intent 값을 변경시켜준다
이렇게 onNewIntent()까지 작성하니까 앱이 포그라운드 상태일 때 intent 값이 잘 들어오는 것까지는 확인했다
이제 알림을 누르면 원하는 스크린으로 이동하게끔 해야했다
근데 여기서 문제 2번이 발생한 것이었다...
액티비티가 intent되고나서 원하는 스크린으로 이동을 해야하는데 이동하지 못하고 있었다
왜냐하면 compose의 NavHost에서 아래와 같이 쓰는 navController를 Activity에서 사용할 수 없기 때문이다
val navController = rememberNavController()이 문제 해결은 다음 글에...
참고백그라운드 앱에 테스트 메시지 보내기 | Firebase Cloud Messaging
의견 보내기 백그라운드 앱에 테스트 메시지 보내기 컬렉션을 사용해 정리하기 내 환경설정을 기준으로 콘텐츠를 저장하고 분류하세요. FCM을 시작하기 위해 앱이 기기에서 백그라운드 상태일
firebase.google.com
- https://yebon-kim.tistory.com/6
그림으로 이해하는 Activity LaunchMode 실험👩🔬
저는 AndroidManifest에서 한 Activity가 여러 번 인스턴스화 되는 것을 피하기 위해 SingleTask 또는 SingleInstance를 구분하지 않고😓 적어주곤 했습니다. 특히 비밀번호 재입력 같이 똑같은 뷰에서 로직만
yebon-kim.tistory.com
- https://developer.android.com/guide/topics/manifest/activity-element?hl=ko
<activity> | App architecture | Android Developers
애플리케이션의 시각적 사용자 인터페이스 일부를 구현하는 활동(Activity 서브클래스)을 선언합니다. 모든 활동은 매니페스트 파일의 {@code } 요소로 나타내야 합니다. 여기에 선언되지 않은 활동
developer.android.com
반응형'Android' 카테고리의 다른 글
[Android] ZonedDateTime, LocalDateTime, Instant의 차이 (0) 2025.10.29 [FCM] FCM으로 notification 구현 - 5 (클라이언트쪽 구현2) (0) 2025.10.27 [FCM] FCM으로 notification 구현하기 - 3(Firebase Functions로 functions 구현) (0) 2025.09.25 [FCM] FCM으로 Notification 구현하기 - 1 (0) 2025.09.23 [Jetpack Compose] 텍스트의 일부분 스타일 변경하기 (2) 2025.08.06